For those of you who may not be aware, several camera manufacturers give their customers a feature that allows, upon half-press of the shutter button, the ability to continuously buffer a number of images. Then, upon full press of the shutter button, the buffered images are written to the memory card as well as the images made after full press. I have found this to be a very useful feature, not only for bird photography but for other kinds as well.
I find this feature very beneficial as I can always capture peak action, whether it is the moment a bird takes flight, a baseball at the instant the pitched ball makes contact with the bat or even at the exact moment when my granddaughter makes contact with a soccer ball to score a goal. Even landscape photographers can find this feature useful as it will allow you to capture a lightning strike during a thunderstorm. No more having to buy expensive gadgets to capture lightning. Few photographers have the skills and reflexes to capture the exact peak moment of action so this feature helps the majority of us get the photograph we really want.
If Pro-Capture sounds a bit confusing I'll use my Fujifilm camera as an example but it basically works the same way as when I was shooting Olympus and, I suspect, it works the same in other cameras which now have this feature.
Here is how it works. again I'll use my Fujifilm camera as the example. I enable the feature in the menu. The camera requires me to use the electronic shutter and high speed burst mode. I normally set my burst rate at 15 or 20 frames per second. That way, my camera will buffer either 15 or 20 frames continuously (1 second's worth) as I half-press the shutter button waiting for peak action. Whether or not I use one speed or the other depends upon the action I want to capture.
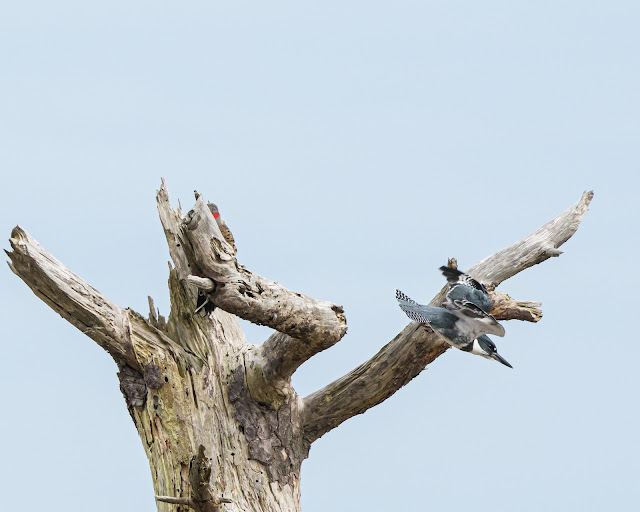
I was on Virginia's Eastern Shore last week looking to sharpen my bird photography skills. I'll use the example wanting to capture this Belted Kingfisher taking flight The Kingfisher is an elusive little bird who can take flight faster than I can blink my eye, it seems. While waiting for this bird to take flight, I composed my image, focused and half-pressed the shutter button. The camera then continuously made and buffered 15 exposures as long as I kept the shutter half-pressed. As time passes, the first exposure in the buffer is replaced by newer exposures. Fifteen always stay buffered in this example. (If you have 20fps set, you will buffer 20 frames) The capturing and buffering exposures go on indefinitely or until your battery drains or you let your finger off the shutter button. I have found that being in a comfortable position and being patient are two necessities while waiting for the action to occur. The last time I tried this with another Kingfisher last November, I sat for about 40 minutes waiting for it to take flight. Whew!
Once I saw this Kingfisher start to fly, I fully pressed the shutter button. The last 15 images that were buffered in my camera's memory as well as the ones that were made as I fully depressed the shutter were then were written to the memory card.
This feature allows me to capture images before, during and after peak action almost effortlessly.
Here are the series of 8 images I made showing this Kingfisher leaving his perch.
I would encourage you to try this feature if your camera has it. I would challenge you to figure out how you can use it even if you don't normally shoot action and such. Use your imagination to capture some images you couldn't previously capture.
NOTE: For you 'eagle eyed' readers, did you notice the Northern Flicker which sits almost fully obscured by the dead branch. The Flicker landed just a few seconds before the Kingfisher took flight.
Thanks for looking. Enjoy!
Dennis A. Mook
All content on this blog is © 2013-2023 Dennis A. Mook. All Rights Reserved. Feel free to point to this blog from your website with full attribution. Permission may be granted for commercial use. Please contact Mr. Mook to discuss permission to reproduce the blog posts and/or images.


This is a wonderful feature. In addition to take offs, it also works well to capture birds or insects returning to a chosen spot. With my slow reflexes, at take off I press the shutter button fully when I first notice movement of a small bird or insect. Otherwise, I tend to overwrite the initial movement when the bird or insect takes flight.
ReplyDeleteAnother use of the feature is to simulate a ND filter for a fountain or waterfall. In Photoshop, stack the images, convert to Smart Object, and merge Mean. Works great.
Thank you for your comment. You made some very good points. Another use that has come to mind is the technique one can use when a very high ISO is required. Use Pre-Shot to take several exposures then in Photoshop blend the images, as you said using the Mean menu feature, which will eliminate the excessive digital noise. I’ve done that but without using Pre-Shot so the exposures are taken less quickly and don’t align quite as well. Thank you again.
Delete