 |
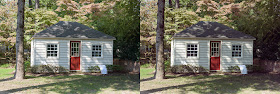
Nominal Image, uncorrected, showing white in sunlight as well as deep shadow
D810, 24-120mm f/4 VR lens, 1/125@f/5.6; ISO 64 |
As I did with my Olympus E-M1, I wanted to find out how technically incompetent a photographer I could be and still "pull a rabbit out of my hat," so to speak, and get a decent image from my new Nikon D810. So, I decided, for my own knowledge and to better understand my D810, its capabilities and its foibles, I would conduct a similar informal experiment as I did with my Olympus E-M5. The operative words here is "informal." This experiment is for my knowledge and I make no claims in a strict scientific manner.
I don't like to be out photographing and expect my gear to perform in a certain manner, only to find out it won't. Conversely, I wouldn't want to be in a position where I don't make an image under severe circumstances, thinking my gear can't handle it, when in fact, it can. Getting to completely understand my gear is the impetus for this, and all my other, gear tests.
So, I set out to photograph the same subject as last week, my shed with bright, direct sunlight as well as deep shadow. The top image is the image I set up. I placed a white towel (below and just to the left of the left side window) in direct sunlight and another white towel in open shade. There are deep shadows to the right under the cedar tree and along the red brick wall.
I attached the Nikon 24-120mm f/4 G VR lens to the D810, set the base ISO (64), placed the camera a heavy duty tripod, set it on manual and determined an exposure that came very close to not clipping either highlights or shadows. I will call this my "nominal" exposure. If this were a real scene, this is the exposure I would use. The nominal exposure was 1/100 second @ f/5.6. The file format was set to RAW with 14-bit lossless compression. I set the camera for auto white balance to see how the color palate changed and how the camera handled potentially shifting colors in overexposure as well as underexposure situations.
I then proceeded to make 8 additional images, 2 stops overexposed, 1 stop overexposed, 1 stop underexposed, 2 stops underexposed, 3 stops underexposed, 4 stops underexposed, 5 stops underexposed and 6 stops underexposed. I was very curious how this new camera and sensor would perform.
Below are the results of the experiment. I know you cannot really assess the quality of images when displayed at a low resolution on a computer monitor, but an overall idea of how correctable overexposed and underexposed images can be made. Again, as last time, this is not the experiment to be all to end all. This is just an informal test, under one condition, so I could better understand the capabilities of my new camera. As I have said before, you better know your equipment well or prepare for disappointment. Others' results may vary with others scenes and other tests.
 |
| Image on the left was overexposed by 2 stops shown as it came from the camera; image on the right was the nominal exposure, as it came from the camera. (click to enlarge) |
 |
| Histogram from the 2 Stops Overexposed image. (above) |
 |
| Image on the left was underexposed by 2 stops; image on the right was the nominal exposure. (click to enlarge) |
 |
| 2 stops underexposed (above) |
 |
| Image on the left was underexposed by 3 stops; image on the right was the nominal exposure. (click to enlarge) |
 |
| 3 stops underexposed (above) |
 |
| Image on the left was underexposed by 4 stops; image on the right was the nominal exposure. (click to enlarge) |
 |
| 4 stops underexposed (above) |
 |
| Image on the left was underexposed by 5 stops; image on the right was the nominal exposure. |
 |
| 5 stops underexposed, very little information on the sensor at this point. (above) |
 |
| Image on the left was underexposed by 6 stops; image on the right was the nominal exposure. |
 |
6 stops underexposed (above)
There is almost no data on the sensor yet a "decent" image was able to be recovered! "Decent" is certainly subjective. |
Here is a comparison of the nominal image on the left and the "corrected" images for the various exposures on the right. I didn't take a lot of time trying to match them exactly. I was more interested in how easily they could be closely corrected with such different exposures. With additional time, which I was not willing at this point to spend, the images could be exactly matched, in my opinion.
 |
| Nominal Image on Left, +2 Stops Overexposed and Corrected Image on the right. The white towel on the left is not clipped. with a two stop overexposure. (click to enlarge) |
 |
| Nominal Image on Left, +1 Stop Overexposed and Corrected Image on the right (click to enlarge) |
 |
| Nominal Image on Left, -1 Stop Underexposed and Corrected Image on the right (click to enlarge) |
 |
| Nominal Image on Left, -2 Stops Underexposed and Corrected Image on the right (click to enlarge) |
 |
| Nominal Image on Left, -3 Stops Underexposed and Corrected Image on the right (click to enlarge) |
 |
| Nominal Image on Left, -4 Stops Underexposed and Corrected Image on the right. Just a tad in red color shift is starting to be detected, but easily correctable. At -4, I added my first noise reduction to the image. Very little needed. (click to enlarge) |
 |
| Nominal Image on Left, -5 Stops Underexposed and Corrected Image on the right (click to enlarge) |
 |
| Nominal Image on Left, -6 Stops Underexposed and Corrected Image on the right (click to enlarge) |
A couple of observations while editing the images. The +2 and +1 stop overexposed images only required very little adjustment. I adjusted "exposure" in Lightroom and that is about all it took to normalize it to the nominal exposure. The white towel in direct sunlight was not clipped in the adjusted exposures at +2 or +1 stop.
Additionally, the images that were -1, -2 and -3 stops underexposure, required a very minimum of adjustments. I did not add any noise reduction to any of those five images.
At -4 stops, again, the image still required minimal adjustment. Along with adding exposure (mid-tone adjustment), I added a bit of clarity to boost the micro contrast a bit and pulled in the highlights slightly. I started to see a very slight red shift in the color balance, but it was easily correctable. Additionally, at -4 stops, I added minimal noise reduction. Based upon these results, I would submit an image made using -4 stops underexposure to my stock agency. I believe it would still meet their editors' criteria. However, I certainly how I would never have to be in that position.
(Note: Adequate noise reduction is a personal standard. I don't mind a little bit of "tooth" to my images. I would rather have a bit of "tooth," as I call it, rather than over reduce any noise and make the image look like a smoothed plastic. A tad bit of fine noise, to me, gives some images character. So the amount of noise reduction that is fine for me, may not be okay for you. My preference goes back to shooting film for over 30 years.)
At -5 stops, I see a little bit more red shift. Noise is more prominent so additional reduction was required. However, raising the Exposure +5 (maximum) in Lightroom 5.6, lowering the shadows slightly and pulling in the highlights slightly with some additional clarity matched the nominal image pretty well. There is some loss of detail in the shadows, as evidenced by the leaves below the red wall on the right. Not sure if you can see it in these images. Still a usable image.
At -6 stops, the noise was significant. Of course the original exposure is almost entirely black! Since +5.00 is a high as Lightroom will allow exposure to be increased, I then went to the Tone Curve panel and added more adjustment to the image to somewhat match the nominal image. (Tone Curve is additive to the main adjustments.) For this noise reduction, I utilized Nik DeNoise 2. (It did a nice job, but it is getting rather dated. I would be interested is seeing how some of the newer noise reduction tools would handle this same image.) Some fine detail was lost and was mushy. Also, I went into Photoshop to reduce the red shift as it was a bit more red than the -4 stop image.
 |
| This is the -6 stop underexposed image right out of the camera! Compare it to the one above and be amazed! |
I could have better color corrected the the images to match, but I just didn't want to spend a significant amount of time closely matching all the images. When I felt I was pretty close, I stopped with all of the images. I would guess that I didn't spend an average of more than 2 to 3 minutes per image.
Generally, I think this new sensor in the D810 is simply remarkable. It seems to handle gross over as well as underexposure very well. In my opinion, I think both overexposed images as well as those that were as underexposed as far as 4 stops, could be corrected to make a good print. At -5 stops, I would still use the image for the web. At -6 stops, I think the image could still be "salvaged" but use would be relegated to small images on the web.
So, there you have it. Even if you are a really technically bad photographer, the Nikon D810 could save you!
As far as my landscape, nature and travel photography go, except for the rare occasion, I believe that I won't have to engage in making blended (normal looking HDR) images in order to fully capture the brightest highlights and the detail in the deepest shadows. I will be taking this camera on my upcoming road trip and I will keep you informed as to how it preforms with its tremendous dynamic range, low noise, great color palate and overall beautiful image quality!
Thanks for looking. Enjoy!
Dennis Mook
Many of my images can be found at
www.dennismook.com. Please pay it a visit. I add new images regularly. Thank you.
All content on this blog is © 2014 Dennis A. Mook. All Rights Reserved. Feel free to point to this blog from your website with full attribution. Permission may be granted for commercial use. Please contact Mr. Mook to discuss permission to reproduce the blog posts and/or image.


Thanks so much for doing this Dennis.
ReplyDeleteIts a little hard to really tell the difference between the D810 and OM-D tests with the photos at web resolution. What are your thoughts on the usability differences between the two cameras when pushed a few stops. The web sized photos appear to look pretty great on each up to 3 or 4 stops, but it is difficult to really see fine detail, noise etc. Not wanting to ask you to do more work, as these tests are already great, but is there any chance you could post a couple of 100% crops showing the difference, side by side with Nikon and Oly? No pressure if you don't want to, I fully understand how much work that is. Thanks again for the great effort you put into these tests. It is very much appreciated.
Greg. thanks for the comment. I'm currently preparing to leave in a few days for a 3 1/2 week road trip. I probably won't have time to post a comparison. I have a lot to do before we leave. That being said, if I do find the time, I will post a comparison over the weekend.
ReplyDeleteVisually, the D810 holds detail in the shadows much better than the E-M1 when you get to 3 or more stops underexposed. With the D810 I see distinct, crisp detail all the way to 5 stops under. With the E-M1, you start to get mushy detail. As a general observation I would say that the E-M1 produced good images from 1 stop over to 4 stops under. The D810 from 2 stops over to 5 stops under. The net is 2 more stops of usability.
I think I am seeing exactly what I suspect I should see. If the E-M1's sensor was better than the D810's, then something is wrong. Size matters, in this case.
Having said all this, if you keep your exposures within a stop or two of nominal, you (and I) will be very happy with the image quality of both cameras. Being a competent photographer, that shouldn't be a problem.
Dennis